Manual

Did you like the program? You can buy or try it now or contact us if you have any questions!

You can find more information in our knowledge base. The latest information, answers to frequently asked questions, and searches for them are located there.

Go to the ClipAI knowledge base >>

This guide will help you write your first article as quickly as possible if you just bought ClipAI, and will also explain more advanced options if you want to generate text on a more professional level. Unfortunately, the instruction is currently written only in Russian, although all the functionality of the program is fully translated into English. You can use the translator built into your browser to read this manual.

Just click on the topic you are interested in below and a detailed explanation will appear on the screen. If you have any questions, write to us at the available contacts or in the online chat (in the lower right corner of the site).

0. I bought the program. What's next?
Here are explanations for those who have not previously worked with Zennoposter. If you have previously worked with them, you are unlikely to find anything interesting here.

If you have not previously owned Zennoposter or Zennobox, after purchase you will be given a password for your personal account, as well as download link Zennobox. It is needed to run the program you purchased: the program itself will already be inside it, there is no need to download it additionally.

After downloading the program, run it. The installation is extremely simple: just click “Next” all the time. At the stage where you will be asked for an e-mail and password, enter the ones that were given to you upon purchase.

After installation and launch, you will see a line with the name of the purchased script. Click on it:

Now at the bottom you can select some settings related to proxy or schedule. We recommend that you always leave the “Log” tab open, as necessary data or warnings may appear there while you work.

To get started for the first time, you need to first open the settings by clicking on the button , and specify the parameters you need.

The general logic of the program is extremely simple. For example, you need to generate articles on 5 previously known topics. For this:

  1. In the “What are we doing?” tab select the mode you need (in this case, “Writing an article”);
  2. In the input field in the “Input Data” tab of the settings, enter the necessary topics (1 topic in each line), or indicate the file from which you want to take the topics;
  3. In the same “Input data” tab, make sure that “Input mode” is “One line - one request”;
  4. In the “Processing” tab, indicate the parameters you need (for example, the number of words/characters);
  5. In the “Output Data” tab, indicate where you want to save the received articles;
  6. Click “Ok”, and then at the top of the Zennoposter window - the button And .

If you need to stop the program without finishing writing an article, right-click on the line with the script, and then .

ClipAI is constantly updated. Description of updates can be found in our Telegram channel. To download the update, simply close and then open Zennoposter or Zennobox: each time you open it, the latest version of ClipAI will automatically download.

1. How to add keywords to an article?

Useful, for example, if you need an SEO article for a website.

To add certain keywords as often as possible, add the following line to the beginning of the text or file, replacing the keywords in it with the ones you need:

[keywords:key words, or phrases]
2. Why do we need 'Custom template' and 'RAW mode', and how to use these modes?

Often this functionality is necessary if the AI needs to do something unusual, and not just write an article or rewrite it.

For example, let's imagine that you need to write a fairy tale in the fantasy style with the main characters you specified. To do this, you wrote a request:

Write a fairy tale in fantasy style with the main characters: dog, cat, bird

However, in the “What are we doing?” tab. you have “Writing an article” indicated. As a result, you may receive the expected response, or you may also receive something like:

Fairy tales are an amazing genre of literature that (...)

Why did it happen? When making a request in the “Writing an article” mode, the AI receives a request like “Write an article on the topic 'write a fairy tale in the style of ...'” (in fact, the request is much more complex for the best quality of the answer, but for the sake of understanding we will simplify it). As a result, the AI may not understand what to do: write an article or a fairy tale? Or write an article about writing fairy tales?

If we use the mode "RAW mode", That everything you write will be a request to the AI. In this way, you can not only write fairy tales, as in the example, but also, for example, solve mathematical problems, or simply change the style of writing the text to the one that you need.

Why do you need the “Custom Template” mode? Let's assume that your task is the same: to write fairy tales with given main characters. And you even have a file with a list of the main characters for each tale:

Dog, cat, bird Hare, fox, wolf Human, good, evil

So that you don’t have to write “Write a fantasy story with the following main characters” before each line, Let’s use the “Custom template” mode. To do this, simply install the above-mentioned file as input data, and in the settings select the “Processing” -> “Text of your template” tab, where we enter:

Write a fairy tale in a fantasy style with the main characters the user specifies.

3. How to speed up the program?

Are articles being generated too slowly? There are several ways to speed things up:

1. Multi-threaded mode

The most effective way to speed up. To use it, in the “Processing” tab, select multi-threaded mode, and then at the bottom of the Zennoposter window, in the “Settings” tab, enter the number of threads in “Maximum threads”, and in “How many to do” - the number of lines in the file that need to be used to generate (you can enter more or click on at the top of the Zennoposter window).

1 thread = 1 concurrently running copy of the program.

2. Changing the rewriting method

“Rewriting” (text synonymization) is the most labor-intensive and time-consuming way of working due to the nature of AI. In some situations, it is more appropriate not to rewrite the text, but to write a new one in the “Writing an article” mode. If this is not possible, try switching the rewriting uniqueness to “Medium” in the “Processing” tab - this should speed up the rewriting several times.

3. Reduce the amount of text generated

In the "Processing" tab, you can specify how many words or characters you need in the text. Perhaps you need smaller text? Then there will be much fewer requests, which means the text will be generated much faster.

4. Disable unnecessary options

Almost everything affects the speed of text creation, for example:

  1. Language: Cyrillic text takes approximately 2 times longer to create than Latin text;
  2. HTML markup usually speeds up generation a little on small text, but slows down on large text;
  3. Creating images for text significantly slows down its publication;
4. How to set up automatic publishing on a site with CMS WordPress?

First, check if your site meets the following requirements:

  1. WordPress version no less than 5.6
  2. The site protocol is https, not http. Even free certificates like LetsEncrypt are suitable. Usually installed with one click in the admin panel of your hosting.

Even if your site does not meet the above requirements, you can install basic-auth plugin to your site: after this, you can log in without the steps below, and you need to enter your WordPress account password as the password. But you shouldn’t do this without a reason: in any case, the lack of HTTPS will significantly lower your site in search results, and an old version of WordPress can add additional problems, including security-related ones.

Publishing in WordPress is configured in the “Publishing” tab of the settings:

We do everything as specified in the input settings. 

Website address - your website in the format:

protocol://domain.com/

Example:

https://google.com/

Exactly like that, with a protocol and a slash “/” at the end.


Login - your login from the administrator account on your site, with which you log into the admin panel. Sometimes this may be by email.

The password is GPT the password for the admin panel, and the application password. How to recognize him?

We go to the WordPress admin panel: usually it is located at the link https://your-site.com/wp-admin/. Select “Users” -> “Profile” on the left:

blank

Scroll down a little further to this form:

blank

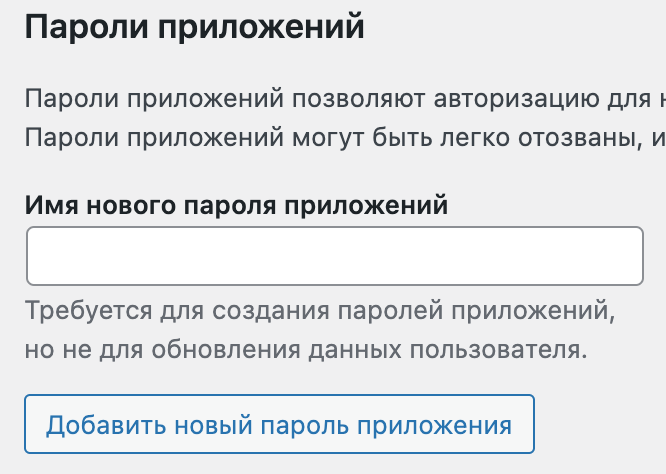
We enter any application name (for example, “ClipAI”); there is no need to remember it: it will not be needed during setup. Click on the “Add a new application password” button. A form similar to this will appear:

This is the application password, which must be entered in the “Password” field.. You must enter exactly as indicated here: with spaces and case sensitive.


If you encounter an error “I received an empty response from a WordPress site”, after doing everything else listed here, try the following:

Open Zennoposter/Zennobox settings:

Go to the “Execution” tab and check the “Use an alternative method for transmitting HTTP requests” checkbox, and increase the “Number of HTTP request attempts” parameter, for example, to the value “5”.


(!) If you use Cloudflare or a similar serviceand you encounter an error when publishing, follow these steps:

In CloudFlare, go to Security > WAF > Firewall rules, Create Firewall Rule. Fill in the fields:

Rule name - rule name - any
When incoming requests match… - (ip.src in {1.1.1.1}), where instead of 1.1.1.1 is the external IP of the computer from which the requests are coming (on which ClipAI is running)
Then... - action - Allow

Set the rule to maximum priority (as high as possible).

If problems arise, do the same steps follow this link.


If you are absolutely sure that you did everything correctly, but a 401 error appears, The problem is in the server configuration. Try one of the following solutions:

1. Open the .htaccess file using the built-in file manager on your hosting or via FTP, and add the line:

SetEnvIf Authorization "(.*)" HTTP_AUTHORIZATION=$1

If that doesn't help, try adding these lines:

RewriteEngine On RewriteCond %{HTTP:Authorization} ^(.*) RewriteRule .* - [E=REMOTE_USER:%{HTTP:Authorization}]

2. Check whether you can switch between Apache and Nginx on your hosting, and whether you can change the PHP version. Try changing these settings.

5. I want to use several copies of the program on one PC with different settings. Is this possible?

Yes, sure.

If you have Zennoposter, Click the button in the upper left corner of the window and then select the file along the path:

Documents\ZennoLab\ZennoPoster\PurchasedProducts\ff8b8f31-36a9-4302-8998-81c72ef07196@zenno.club\GPT.zp

If you have Zennobox, click on the top of the window and then enter the path:

Documents\ZennoLab\ZennoBox\PurchasedProducts\ff8b8f31-36a9-4302-8998-81c72ef07196@zenno.club\GPT.zp


Explanations for specific parameters:


'What are we doing?' tab

We are writing an article
— writing an article with a title or keyword specified as input. Please note that in this mode you do not need to write the entire query: for example, instead of “Write an article about giraffes,” enter “Giraffes.”
Rewrite — changing a ready-made article at the input so that most of the words are replaced with synonyms. In the “Processing” tab you can specify the uniqueness of the output text. Please note that “High” uniqueness is not always needed: for detailed explanations, see the description of the “Processing” tab.
Antidetect+Uniqueness — increasing the uniqueness of already written text, as well as various improvements so that other services do not recognize the text as written using AI. Please note that this mode is necessary in extremely rare cases, because it works for quite a long time due to the nature of the AI, and many search engines (for example, Google) have already announced that automatic writing of articles on the site will not be taken into account when determining the site’s ranking in search results.
Generating the program code — generation of source code for programs according to specified conditions. Usually necessary if your site is for programmers, and the articles are about what code is needed for a particular program or function.
Generating reviews — generation of text reviews or comments. At the input - an article that needs to be commented on, or a description of something that needs to be reviewed. The output is a text file with reviews. Please note that if you need to generate reviews for new articles on your WordPress site, then you do not need to enable this mode separately: you just need to enable the corresponding option in the “Publish” tab.
Creating ideas for articles — creating article titles, ideas for something, and so on. The input could be, for example, a keyword, a general idea, a year, etc. Useful if you don’t know what topic to write new articles for your site on: the output file after using this mode can be immediately used as the input file for the “Writing an article” mode.
Generating images - creating images, the input is what should be depicted on them, the output is the images themselves. Please note that if you need to generate images for new articles on your WordPress site, then you do not need to enable this mode separately: you just need to enable the corresponding option in the “Publish” tab.
Translator - very high quality translation from one language to another. The output language is set in the “Processing” tab.
Custom template — indicate to the bot yourself (in the “Processing” tab) what needs to be done with the specified text.
RAW mode — entering requests to the bot without specifying a given algorithm of actions.

More detailed explanations of the modes "Custom template" And "RAW mode" are indicated in the section "2. Why do we need 'Custom template' and 'RAW mode', and how to use these modes?» this instruction.

'Input Data' Tab
Where to get the input data?
From the input field — the text is taken from the large input field just below.
From file — the text is taken from the text file you selected.
From every file in the folder - you select a folder from which to take text files, which contain the text to be entered.
(Multi-thread) take from file - from a file of your choice in multi-threaded mode. Use in conjunction with increasing the value of the “Maximum Threads” parameter at the bottom of the Zennoposter screen, “Settings” tab.

Input mode
One line - one request — each line in a text file or input field will be considered a separate request. It is necessary if you have several different topics for articles, or subtopics for one article, in one text file.
All content - one request — the entire contents of a text file or input field will be considered one request, regardless of how many lines it contains. It is necessary in extremely rare cases when several lines are required to explain the request.

Delete lines of text after taking — works only in the “Where to get input data?” mode - “From a file.” If this option is checked, permanently deletes lines from the input file that have already been used by the AI.

'Processing' tab
ARE COMMON

Long article must continue — a parameter indicating exactly how the continuation of the article should be generated if one request was not enough to write an article of the required size:
No subheadings — the continuation will not contain subheadings, i.e. the article after the main part will not be divided into them.
At the discretion of the AI - the way the AI wants. Often - with subheadings of various types.

How to limit the number of characters — affects the quantity parameter. It can be specified in symbols or words.
Quantity (from) And quantity (up to) — minimum and maximum length of the article. Selected randomly in this interval; will usually be closer to the minimum value.
Continue the article if there are not enough characters in one answer — is it necessary to send additional requests for this article if the length from one request is less than the minimum specified.
Generate article with HTML markup:
Yes — the article will contain basic HTML codes: for example, h1, h2, h3, p, b, i.
Yes (extended) — the article may also contain additional HTML codes: for example, to create a table, an online calculator in JavaScript, etc.
No — the article will be in plain text, without HTML markup. It is not recommended if you plan to publish the resulting article on your website, since all text will be the same size, color, etc.

Remove h1 tag — if this option is enabled and if the output text contains the HTML “h1” tag, then it is deleted along with its contents.

WRITING AN ARTICLE

Style - article writing style. Selectable from Formal, Informal, Not Specified. In most cases, it is better to leave it as “Unspecified”.
To set keywords write them at the beginning of the file/input field in the format:
[keywords:your, keywords, words, or phrases]

REWRITE

Uniquenessaverage ­ high. If you have no problems with the uniqueness of the output article, it is best to leave “Medium”. Below is a comparison table of the average text for different types of rewriting:

Average High
The percentage of uniqueness of the article at the output (if the input is 0%) 80-90% 100%
Operating speed As quickly as possible 5 times longer
Logical coherence of the text High Average
Spelling mistakes No Very rare


CODE GENERATION

Detailed comments - if enabled, then usually the output code will have comments and a detailed explanation of which function does what.

IMAGE GENERATION

Output Image Size — size for generating AI in pixels. For some types of generation, changing this and other parameters related to size will not give any result. You can also select "Resize an image", and select a custom size. Please note that usually when choosing a custom size, cropping occurs from the one selected in the "Output image size«.

YOUR OWN TEMPLATE

A detailed description of this mode and its parameters is provided in the section “2. Why do we need 'Custom template' and 'RAW mode', and how to use these modes?» this instruction.

'Options' tab
Where to get the Secret key - if you want to work with GPT, you will need a Secret key (also sometimes called an “API key”, it’s the same thing). Accordingly, the program should receive your API key. In this parameter you indicate where to get it from: from the input field, which is located just below; or from a file, which can also be specified in one of the following parameters.
You can get an API key in your OpenAI profile after registration.

Timeout for waiting for a response to a request from AI (sec) — how many seconds to wait for a response to each AI request. If you set a small value, there will be frequent errors if the AI does not have time to generate a response due to server load. At the same time, if you set the value too high, the program may wait in vain for a response if, for example, it did not reach the server due to a poor Internet connection.

Model used — Selecting the AI that will process requests:

GPT-3.5 - new AI.
GPT-4 - the latest AI.
Gemini 1.0 Pro — AI from Google: in our opinion, alternative to GPT-3.5.
Gemini 1.5 Pro - the latest AI from the company Google: in our opinion, alternative (and sometimes even better) to GPT-4.


It is recommended that only experienced users change the following settings. If the quality of your text writing has deteriorated significantly, it is recommended to return these parameters to the default value.


Text spamminess — adjustment of the “Spaminess” parameter, which can be seen when checking the text in various SEO analyzers. The higher the “Spaminess” in the text, the more often the keywords are repeated in it. If you lower the value of the parameter, the AI will try to find synonyms for frequently repeated words. However, if you set the parameter too low, the AI may start coming up with some synonyms and terms once it runs out of all the synonyms it knows.

Variety of text — the lower this parameter, the less the AI will deviate from the topic, and the more it will comply with the instructions given to it.

'Output data' tab

Keep…

Each request is in a separate file — text files will be saved in the folder, the names of which are your request, and inside - the answer to a specific request. If you run several executions with the same request, the results of writing the text will be placed in the same file. And vice versa, if you make one execution with several different requests, then the answer to each of them will be placed in a separate file.

Requests in one execution - in one file — text files will be saved in the folder, the names of which will contain the date, time and execution ID, and inside - answers to all requests made within one execution. If you run multiple executions, the results of different executions will always be in different files, regardless of the request. Please note that when using this mode in conjunction with adding articles to a site (for example, WordPress), the result of the entire execution will be placed in one article, and not just one request.


Add a "____" separator between different articles — whether to add a separator consisting of underscores between several articles in one file.

Separator with ID — specific functionality for dividing articles. The meaning is as follows: at the input you write the title of the article and its number. At the output, the article is marked with the corresponding number. Example:

At the entrance:

Title of article 1234 Another article 4321

At the exit:

-==- 1234 -==- Result of the first article -==- 4321 -==- Result of the second article
'Publish' tab

WordPress


Where to get the site, login and password for WordPress — you can choose where to get information to access your WordPress site: from a file (usually used if you have several sites to which you need to add articles alternately), or from the input fields just below. What to enter as access data is indicated in the spoiler 4. How to set up automatic publishing on a site with CMS WordPress?. We recommend that you read it as carefully as possible, since much here is not obvious: for example, a password is GPT the password for the admin panel, and the site address must be specified in a certain format.

Automatically create and add meta tags — if checked, ClipAI will automatically come up with and enter information for SEO optimization into the “Yoast SEO” plugin: for example, the title and description meta tag. Recommended for best search engine optimization. notethat not only the plugin must be installed and activated on your site Yoast SEO, but also a plugin REST API Meta Support.

Status of articles — you can select the following statuses:

Published for everyone — the article is available to all users immediately after publication;

Planned — the article will be available to all users when a certain date and time specified in the fields below occurs;

Draft — the article can be found and subsequently published only through the administrator’s personal account (wp-admin);

Published for administrators — the article is published on the site and assigned its own URL, but only users logged into their personal account on the site with the account status “Administrator” can read it.


To generate images use:

DALLE-2/3 - artificial intelligence for creating images from OpenAI. It does an excellent job of creating unique images, but their quality may suffer if the topic is too atypical and not simple. Some generation parameters are specified in the “Processing” tab.

Freepik — automatic search, downloading and use of images from the corresponding service. Almost always the pictures fit perfectly with the article, but they are not unique.


Set featured_media — whether to set one of the generated images to preview. How it will look depends on the theme you use on the site: it could, for example, simply be a large image, or an image used on a category page.

Upload to a specific category (heading) — the name of the category in which to upload articles.

Add YouTube videos on the topic of the request - if enabled, ClipAI will automatically search for videos on YouTube and embed them at the beginning of the article. Below you can specify the size in pixels of the embedded video window. Some users believe that enabling this setting can help increase the time spent on the site and thus reduce the bounce rate.

Write comments for an article — if the parameter is enabled, ClipAI will automatically write comments on the article. Their number and mood are indicated in the “Processing” tab. They will be relevant to the topic of the article. Both comments and names and publication dates are generated using AI.

Fix for Litespeed - if enabled, will work with sites that do not support the standard WordPress URL /wp-json . For example, these include sites that use Litespeed. However, on such sites there may be problems with some of ClipAI’s functionality: for example, with publishing in categories.