ClipAI - Knowledge Base (FAQ)
First start. How to launch ClipAI, configure it, and write your first articles?
For the first launch with the simplest parameters, you need to do the following:
- If you have not previously owned Zennoposter or Zennobox, you don't need to buy anything extra! After purchasing ClipAI, you will be given a password for your personal account, as well as download link Zennobox. It is needed to run the program you purchased: the program itself will already be inside it, there is no need to download it additionally.
If you have Zennobox, run the downloaded program and follow the simple installation process by clicking “Next”. Enter the e-mail and password given to you upon purchase. - After installation and launch, click on the line with ClipAI.

- At the bottom of the window you can change some settings (for example, the number of executions, the maximum number of threads, and the schedule), but it is recommended to leave the “Log” tab open to display the work progress. At the bottom of the Zennoposter screen The “Proxy” parameter should always be in the “Do not use” position, even if you use it in input settings.
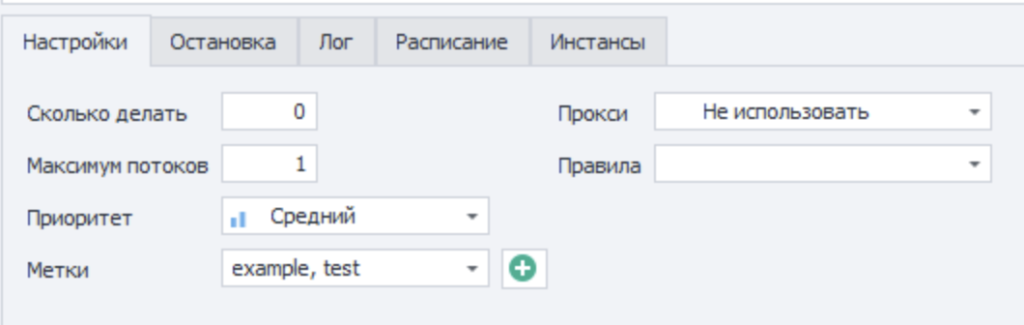
- In the "How much to do" option at the bottom of the Zennoposter screen, you need to specify the number of lines in the file that you want to use for generation, if you are using multithreaded mode. In other cases, you must enter "1".
In the “Maximum threads” parameter you enter the number of threads that the program will use to process tasks. For example, 1 thread corresponds to 1 simultaneously executed copy of the program, and one simultaneously generated article. How many threads are installed - articles are written so many times faster. If you are using multi-threaded mode − Necessarily in the input settings (point 4) -> “Input data” tab, set the mode “(Multi-thread)…”. - To start working for the first time, you need to open the ClipAI settings (right-click on the line with the script - “Settings”, or by clicking on the button
 ), and indicate the data you need for work:
 - In the “Home” tab, select the required operating mode, for example, “Writing an article.” It is recommended to use the sectioned writing mode: if you have an article of more than 2000 characters, you will get the highest quality content here.

Detailed information about the various operating modes can be found both in this knowledge base and in the input settings, at the end of the "Home" tab. - In the “Input Data” tab of the settings, enter the required topics (one topic in each line, if “One line - one request” is set) or specify the file from which the topics will be taken.
- In the “Processing” tab, specify the necessary parameters, such as the number of words or characters, HTML markup generation, etc.
- Detailed information about some operating modes can be found in this knowledge base, and brief reference to practical to each parameter - directly in the settings by hovering the mouse cursor over "
- In the “Output Data” tab, specify where to save the received articles.
By default, “{-Project.Directory-}” is installed here, but you can install any other one. And to go to the project directory, right-click on the line with the script -> “Project Directory”. - Click “Ok” and then the “Start” button (and “+1” if you did not enter the required number of executions in step 3) at the top of the Zennoposter window.


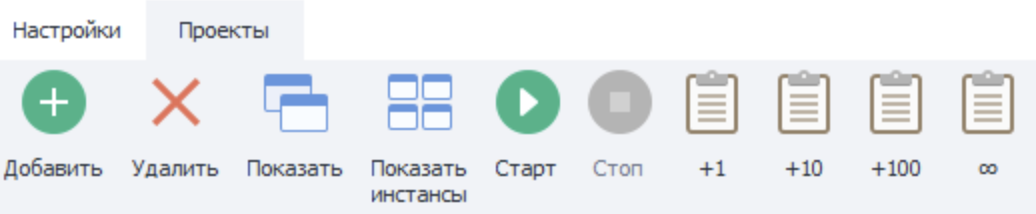
To stop the program before finishing writing the article, you need to right-click on the line with the script -> “Abort”. ClipAI updates automatically every time you launch Zennoposter or Zennobox.
ClipAI is constantly updated. Description of updates can be found in our Telegram channel. To download the update, simply close and then open Zennoposter or Zennobox: each time you open it, the latest version of ClipAI will automatically download.