How can I use the ClipAI as conveniently as possible when the computer is turned off, or on different PCs?
The most convenient way to use ClipAI is on a VPS server. Let's consider this method in more detail.
You can rent your own server on Windows OS, which will work around the clock. This will allow:
- Automatically fill your sites with content even when your PC is turned off.
- Work with ClipAI from different PCs (for example, at home and at work).
- It's easy to transfer access to an assistant, without the need to transfer settings.
- Work on MacOS if something doesn’t suit you way to work via Parallels Desktop.
A server suitable even for multi-threaded work usually costs only about $5 per month.
For users from the Russian Federation we can recommend PlanetaHost. Despite the rather old design of the main page, the services of this hoster are as cheap as possible, and the quality is also quite good. Supports payments only with Russian bank cards and payment systems.
Users from other countries can take advantage of some pretty good hosting services senko.digital. It is also suitable if you need a cheap, yet powerful server with excellent support. And with the promo code CLIPAI you will get 10% discount on the server. Supports payment by any cards, as well as cryptocurrency, Paypal, and other payment systems.
Let's look at how to rent a server and install ClipAI on it. All this will take approximately 10 minutes.
If anything in this instruction is not clear - write to us, or send a link to these instructions to support your chosen hoster.
1. Register on the site:


2. In your personal account, select the item "Virtual servers".
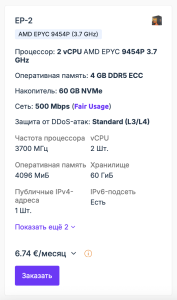
3. Choose the cheapest server with at least 2 processor cores, 2gb RAM, and support for Windows (note that on the senko.digital not all tariffs support Windows; the minimum tariff that supports it is EP-2):


You can choose a tariff with higher specifications if necessary; but definitely not lower. ClipAI speed and maximum number of threads depend on the characteristics (primarily RAM size), but ClipAI is perfectly optimized to work even on not the most powerful PCs.
4. Select “Operating system” - “Windows 10”, or “Windows Server 2019”.
If you rent a server on senko.digital, don't forget to enter the promo code CLIPAI to obtain 10% discount.
Ready! Your server is running. Now you can go to it and install ClipAI, just like on a regular PC. To do this, you just need to select the created server and click “Go”:
And then select "VNC" to work directly in the browser:
Not satisfied with the speed of the server through the browser? Connect to it via RDP. For this:
- On Windows: Click Start, type “Remote Desktop Connection,” and then enter the IP address that is listed in your account.
- On MacOS: download the program Microsoft Remote Desktop, and then in the program click on “+” -> “Add PC”, and enter the IP address that is indicated in your personal account.
The login and password for RDP access is usually specified when you pay for the server, or is sent to your email after the lease starts.